
When I was putting some thought into todays blog I came across this article I had written some years ago. At that point in time the trusty CompuTrainer Pro was one of the most affordable ways of analyzing data, not only power but also an athletes pedal stroke through their SpinScan software.
Now days it's way easier with programs like Cycling Dynamics from Garmin or some of the clever chats in WKO5 to name but two. While some of the terminology may be a little dated the principle of what this article is about still holds true today.
Not much in life truly is “free”, however, improving your pedal stroke will give you “free watts” and ultimately more speed… for free!!!
To illustrate just what I’m talking about, take a look at the table below taken from one of my athletes during a ride.
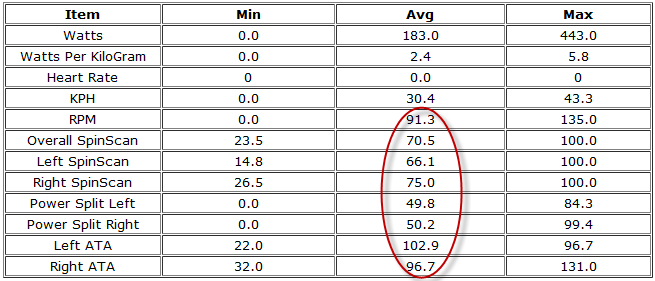
For the purpose of this article, I have circled the important data.
“SpinScan” measures the efficiency of your pedal stroke as a percentage. As you can see with the athlete above, his right leg is more efficient than his left. Ideally, a pro athlete will be in the 70’s – 80’s while the recreational rider will be in the 50’s.
“Power Split” is self explanatory but essentially displays power output differences between left and right leg as a percentage.
“ATA” (Average Torque Angle) displays the average point in degrees that represents efficient crank arm length usage. The best “bang for your buck” will be at 90 degrees.
Improving your pedal stroke will apply more power to your cranks and ultimately your wheels no matter what discipline of riding you are involved in.
The fact is that every rider should strive to improve their pedaling efficiency no matter what level they compete at.
So, how should you pedal then?
Imagine looking at your bike from the right hand side, now divide the circle of the pedal stroke into the hours on a clock and then into four sectors of three hours each.
Zone 1 (11 – 2 o’clock)
Imagine you are “rolling a barrel” under your foot. At 11 o’clock you begin to push forward and across the top of the pedal stroke until your foot reaches 2 o’clock.
By applying force before the down stoke begins you are effectively creating a longer power stroke.
Zone 2 (2 – 5 o’clock)
This is the power phase of your stroke. Most beginners pedal straight up and down but this should only be the case at 3o’clock as that is when your pedal is at 90deg. At 2 or 4 o’clock you should be moving the pedal slightly forward and down or slightly back and down respectively.
Zone 3 (5 – 8 o’clock)
Here you need to “scrape the mud” from the bottom of your shoes… yes, roadies too… :-)
This will assist in keeping a constant force throughout the entire pedaling circle and help the leg that's moving the pedal up over the top of the stroke.
Zone 4 (8 – 11 o’clock)
When your right leg is at 8 o’clock your left leg is at the beginning of the power phase, 2 o’clock. Ultimately we want 100% of the power applied by the left leg to be transferred to the rear wheel and move the bike forward. However, if your right leg, at 8o’clock, is "dead" on the pedal, then a percentage of your left leg power is not applied to the rear wheel but instead is used to lift the right leg. Now, this lifting effect is probably less than you think, as your right leg, spinning at 90+ rpm, does have a significant amount of momentum to "throw" it over the top of the pedal stroke.
Instead, from 8-11 o’clock we want to "de-weight" the pedal, applying just enough lifting force to make our foot weigh zero on the pedal, so 100% of the work performed by the opposite leg is used to propel the bike forward. This motion will bring your hip flexors into play and apply power on the upward phase of the pedal stroke.
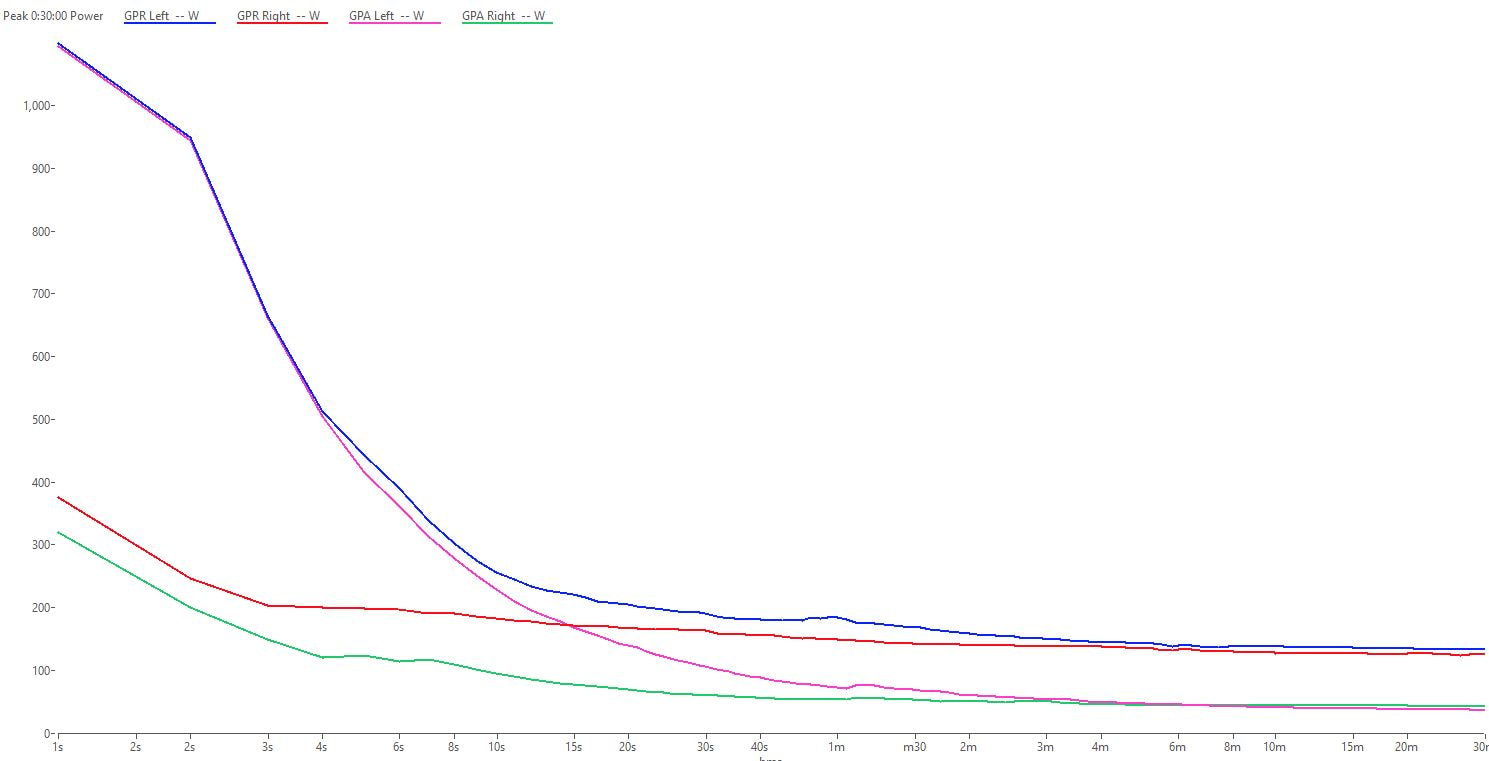
The chart below is from my ride this morning but now using my Stages Dual Sided PM and then viewing the data through WKO5. This gives a good graphical representation of what I'm talking about in the section above.
Here the terminology is a little different so see the explanation below:
GPA - Gross power absorbed
GPR - Gross power received
Essentially this chart displays your mean max gross power curve for each leg.
Got to love technology, no more labs... :-)
“SpinScan” measures the efficiency of your pedal stroke as a percentage. As you can see with the athlete above, his right leg is more efficient than his left. Ideally, a pro athlete will be in the 70’s – 80’s while the recreational rider will be in the 50’s.
“Power Split” is self explanatory but essentially displays power output differences between left and right leg as a percentage.
“ATA” (Average Torque Angle) displays the average point in degrees that represents efficient crank arm length usage. The best “bang for your buck” will be at 90 degrees.
Improving your pedal stroke will apply more power to your cranks and ultimately your wheels no matter what discipline of riding you are involved in.
The fact is that every rider should strive to improve their pedaling efficiency no matter what level they compete at.
So, how should you pedal then?
Imagine looking at your bike from the right hand side, now divide the circle of the pedal stroke into the hours on a clock and then into four sectors of three hours each.
Zone 1 (11 – 2 o’clock)
Imagine you are “rolling a barrel” under your foot. At 11 o’clock you begin to push forward and across the top of the pedal stroke until your foot reaches 2 o’clock.
By applying force before the down stoke begins you are effectively creating a longer power stroke.
Zone 2 (2 – 5 o’clock)
This is the power phase of your stroke. Most beginners pedal straight up and down but this should only be the case at 3o’clock as that is when your pedal is at 90deg. At 2 or 4 o’clock you should be moving the pedal slightly forward and down or slightly back and down respectively.
Zone 3 (5 – 8 o’clock)
Here you need to “scrape the mud” from the bottom of your shoes… yes, roadies too… :-)
This will assist in keeping a constant force throughout the entire pedaling circle and help the leg that's moving the pedal up over the top of the stroke.
Zone 4 (8 – 11 o’clock)
When your right leg is at 8 o’clock your left leg is at the beginning of the power phase, 2 o’clock. Ultimately we want 100% of the power applied by the left leg to be transferred to the rear wheel and move the bike forward. However, if your right leg, at 8o’clock, is "dead" on the pedal, then a percentage of your left leg power is not applied to the rear wheel but instead is used to lift the right leg. Now, this lifting effect is probably less than you think, as your right leg, spinning at 90+ rpm, does have a significant amount of momentum to "throw" it over the top of the pedal stroke.
Instead, from 8-11 o’clock we want to "de-weight" the pedal, applying just enough lifting force to make our foot weigh zero on the pedal, so 100% of the work performed by the opposite leg is used to propel the bike forward. This motion will bring your hip flexors into play and apply power on the upward phase of the pedal stroke.
The chart below is from my ride this morning but now using my Stages Dual Sided PM and then viewing the data through WKO5. This gives a good graphical representation of what I'm talking about in the section above.
Here the terminology is a little different so see the explanation below:
GPA - Gross power absorbed
GPR - Gross power received
Essentially this chart displays your mean max gross power curve for each leg.
Got to love technology, no more labs... :-)
Ok, I’m “sold”, now how do I improve my pedal efficiency? Simple… you have to groove your stroke and the easiest way to achieve this is through various drills.
Here are a few suggestions…
Single-leg pedaling:
Do this on a stationary trainer. Unclip one leg and rest it on something and pedal with just the other leg. Keep the cadence, resistance and duration low until you develop your technique; start at 60 rpm. Alternate legs about every 30 seconds (or when you get fatigued) and gradually (over several weeks of practicing) increase the duration, cadence and then the resistance.
Pedaling with one leg will force you to move the pedal in full circles. You will notice right away how much work it is to pull through the bottom of the pedal stroke and lift the pedal back up and over the top. Try to eliminate the dead spots at the bottom and top of the pedaling circle, and keep the pedaling motion as even and smooth as possible. You should begin to see some improvement after a few weeks. Don't make the mistake of using momentum to "throw" the pedal up over the top. Move it purposefully.
Back and forth:
This drill emphasizes the application of pedaling force in the areas that are usually in the most need of improvement (the top and bottom of the pedaling circle). During this drill you'll be focusing on pushing the pedals over, or across, the top of the pedaling circle, and pulling them back through the bottom. Think about moving the pedals back and forth rather than up and down.
After a while you'll begin to develop a better overall pedaling force application by learning to apply force over the top and through the bottom of the stroke. As with the other drills, work on keeping the muscles relaxed.
This drill can be done on any ride at any time. Try and include it as often as possible.
Lifting your knee:
When climbing, focus on lifting your knees. This will un-weight the pedal and you'll notice less resistance; this is good. Think about bringing your knees straight up and pushing straight down over the top of your foot.
Focus on one portion of the pedal stroke at a time and you'll be able to improve it quicker. Then gradually piece them all together as one cohesive movement.
Until next time, stay warm...

 RSS Feed