Virtual Training Centre NZ
  • Home
  • About
  • Services
  • Training Plans
  • Blog
  • Contact us

Planning Your Season

26/6/2020

1 Comment

 
Picture
Most cyclists don’t consciously “select” a training system… it just happens…
They jump on their bike every day then based on how they feel they “decide” just what training they should do. This could be a 60min time trial, or a group ride with their mates… usually letting the senior riders dictate the days workout… sound familiar?
For the record… this is NOT the way to achieve your true potential as a bike racer.
 
In truth, there are three different training systems, namely “racing into shape”, the “always fit” method and “periodization".
​Periodization can be broken down still further however for the purpose of this article we will stick to the "classic" periodization model.
 
The “Race into shape” method:
This is the most common training system used by cyclists as it’s easy to do…

Step 1 involves building a large aerobic base by pedaling around 1500km – 2000km at an easy pace. While this amount of “easy” riding works, in truth for some it’s simply too much while for others it’s just not enough…

Step 2 involves racing every weekend and getting in a mid-week race (if available) or a hard group ride. The result will be a higher level of fitness…

There are some good reasons to use this method of training, the most important being that the fitness gained is specific to the demands of racing.

Training this way however is unpredictable as there is no planned rest and as a result overtraining can occur.
 
The “Always fit” method:
In warm climates cyclists often try to stay in race-shape through the year. The cooler weather and frequent races through-out winter entice them to keep a constant level of fitness by doing the same training riding week in and week out.

The greatest issue facing this type of athlete is boredom and burnout. Burnout is not a pretty sight. All interest in training, racing and life in general goes for a “ball”…

Another problem has to do with physiology as after about 12 weeks of training the same way, improvements seem to plateau… since fitness is never static, if you are not improving you must be getting worse!!!
 
The “Periodization” method:
This is the system used by most successful athletes today.

The basic principal of all periodization programs is that training should progress from general to specific.
Yes, periodization means more than simply training more specifically. It also involves arranging your workouts in such a way that the elements of fitness achieved earlier in your training are maintained while new ones are addressed and improved. This modular approach to training means making small adjustments in your workouts every 4-8 weeks.

Flexibility of training or the lack of it may be the biggest obstacle facing a cyclist using periodization as successful periodization requires flexibility.

The language of periodization seems to confuse many; however the following are the terms that I like to use as these are the terms made popular by the likes of Joe Friel, Hunter Allen and Dr Andy Coggan amongst others…
The terms are as follows: Preparation Phase, Base Phase, Build Phase, Peak Phase, Race Phase and finally the Transition Phase.
 
Training Phases:
Trying to improve all aspects of training at once is simply not possible hence the need to break your training down into manageable “phases” as indicated above.
The elements common to most periodization plans are increased volume at the start of the training season followed by increased intensity as the volume decreases.
 
Preparation Phase:
This phase generally marks the start of your training year and is included only if there has been a long transition following the end of your previous Race Phase.
The purpose here is to prepare your body for the next phase of your training plan. Workouts are low intensity with an emphasis on aerobic endurance, especially in the form of cross-training.
The total volume of training is low when compared with most other training phases.
Speed skills can be developed through drills, usually done on an indoor training or a set of rollers.
 
Base Phase:
The Base phase is your time to establish your basic fitness abilities of endurance, force, and speed skills. Generally, this is also the longest phase of your season and should last around eight to twelve weeks.
The base phase is divided into three segments: Base 1, Base 2 and Base 3.

Base 1 marks the start of steady increases in volume to boost your aerobic endurance and increase your body’s resilience to handle larger training loads.

In Base 2, on-bike endurance work begins to replace cross-training as the training volume increases. As your road rides become longer, the companionship of a group helps to pass the time. Just make sure that you ride with a group that rides at YOUR required pace and does not turn every ride into a “race”.

The majority of your road rides should be on continuously rolling to hilly routes that place controlled stress on your neuromuscular system. The best routes at this time of the season keep your efforts below threshold and allow cadences of around 80rpm and higher while seated on a hill.

Muscular-endurance training is also introduced in Base 2, with the addition of Tempo workouts based on hear rate or power output.

Base 3 marks a phasing-in of higher intensity training with the introduction of some proper hill work done at or slightly above threshold. Base 3 also brings about your highest total weekly volume of training with aerobic rides accounting for more than half of your training time. By the way, your longest training rides should now be as long as your longest race of the season, or two hours… whichever is the longer…

Group rides are still the best way to get the miles in but while it’s ok to occasionally put the hammer down in a sprint, just make sure you don’t turn these rides into “races”!!!

Your purpose now is to get as fast as you can with low-effort rides before turning up the heat in you Build phase.
By now, several weekly workouts should now have you riding at threshold, while your Speed-skills work is done mostly as “Form Sprints” on the road.
 
Build Phase:
Anaerobic-endurance is now introduced in your Build phase and just with force, hill work, and muscular-endurance training, this should be done with caution to avoid injury.

Feel free to race during this phase of your training, but remember that these are low priority races and you should regard them as a substitute for some of your anaerobic-endurance workouts. Anaerobic-endurance workouts may also include intervals and fast group rides.

During Build 1, endurance work is reduced but is still a prominent focus of your training. You would be better off by doing your long easy endurance rides at this stage with one or two team mates or training partners rather than a large group. Use the group rides for the development of muscular-endurance and anaerobic-endurance.

In Build 2 you again slightly decrease the volume of your training while increasing the intensity. Training in Build 2 emphasizes intensity to a greater extent than in the previous four weeks. Anaerobic-endurance and muscular-endurance sessions become longer while recovery is decreased between your efforts. 
 
Peak Phase:
Now is the time you consolidate your racing fitness. It’s time to reduce your volume and keep intensity levels high relative to your expected demands of your targeted races while emphasizing recovery between workouts. Ideally you would want to train at race-pace intensity every 72-96hrs.

These workouts may also include “B” or “C” priority races that serve as a tune-up for the “A” races that follow.
 The purpose of periodization is to reach peak form just as the important races occur.
 
Race Phase:
Whoop, Whoop… this is the FUN TIME!!!! Now all that is needed is to race, work on your strengths and recover…
In weeks where there are no races, a race-effort group ride is the best option.

Until now you have been working on your “limiting factors”, now it’s time to improve your strengths, so make them as strong as possible!!!
 
Transition Phase:
Your transition phase is a time for rest and recovery following your race phase. This should always be included after your last race for the season, but may also be inserted early on in your season following your first Peak phase to help prevent burnout later in the year.

Early season Transition phases may be brief periods of perhaps five to seven days, while at the end of your season such a break may be four weeks or so.
 
Use this time to “recharge your batteries” for your training and racing to come….
 
Remember, “If you can’t measure it, you can’t manage it!”
1 Comment

Improving your pedal stroke for more power

12/6/2020

0 Comments

 
When I was putting some thought into todays blog I came across this article I had written some years ago. At that point in time the trusty CompuTrainer Pro was one of the most affordable ways of analyzing data, not only power but also an athletes pedal stroke through their SpinScan software.

Now days it's way easier with programs like Cycling Dynamics from Garmin or some of the clever chats in WKO5 to name but two. While some of the terminology may be a little dated the principle of what this article is about still holds true today.

Not much in life truly is “free”, however, improving your pedal stroke will give you “free watts” and ultimately more speed… for free!!!
 
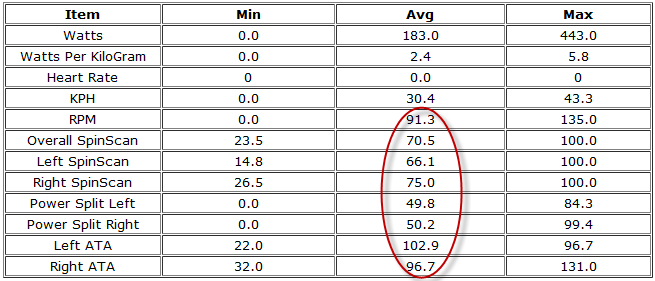
To illustrate just what I’m talking about, take a look at the table below taken from one of my athletes during a ride.
Picture
​For the purpose of this article, I have circled the important data.
​
“SpinScan” measures the efficiency of your pedal stroke as a percentage. As you can see with the athlete above, his right leg is more efficient than his left. Ideally, a pro athlete will be in the 70’s – 80’s while the recreational rider will be in the 50’s.
“Power Split” is self explanatory but essentially displays power output differences between left and right leg as a percentage.
“ATA” (Average Torque Angle) displays the average point in degrees that represents efficient crank arm length usage. The best “bang for your buck” will be at 90 degrees. 
 
Improving your pedal stroke will apply more power to your cranks and ultimately your wheels no matter what discipline of riding you are involved in.
The fact is that every rider should strive to improve their pedaling efficiency no matter what level they compete at.
 
So, how should you pedal then?
Imagine looking at your bike from the right hand side, now divide the circle of the pedal stroke into the hours on a clock and then into four sectors of three hours each.
 
Zone 1 (11 – 2 o’clock)
Imagine you are “rolling a barrel” under your foot. At 11 o’clock you begin to push forward and across the top of the pedal stroke until your foot reaches 2 o’clock.
By applying force before the down stoke begins you are effectively creating a longer power stroke.

Zone 2 (2 – 5 o’clock)
This is the power phase of your stroke. Most beginners pedal straight up and down but this should only be the case at 3o’clock as that is when your pedal is at 90deg. At 2 or 4 o’clock you should be moving the pedal slightly forward and down or slightly back and down respectively.

Zone 3 (5 – 8 o’clock)
Here you need to “scrape the mud” from the bottom of your shoes… yes, roadies too… :-)
This will assist in keeping a constant force throughout the entire pedaling circle and help the leg that's moving the pedal up over the top of the stroke.

Zone 4 (8 – 11 o’clock)
When your right leg is at 8 o’clock your left leg is at the beginning of the power phase, 2 o’clock. Ultimately we want 100% of the power applied by the left leg to be transferred to the rear wheel and move the bike forward. However, if your right leg, at 8o’clock, is "dead" on the pedal, then a percentage of your left leg power is not applied to the rear wheel but instead is used to lift the right leg. Now, this lifting effect is probably less than you think, as your right leg, spinning at 90+ rpm, does have a significant amount of momentum to "throw" it over the top of the pedal stroke. 
Instead, from 8-11 o’clock we want to "de-weight" the pedal, applying just enough lifting force to make our foot weigh zero on the pedal, so 100% of the work performed by the opposite leg is used to propel the bike forward. This motion will bring your hip flexors into play and apply power on the upward phase of the pedal stroke. 

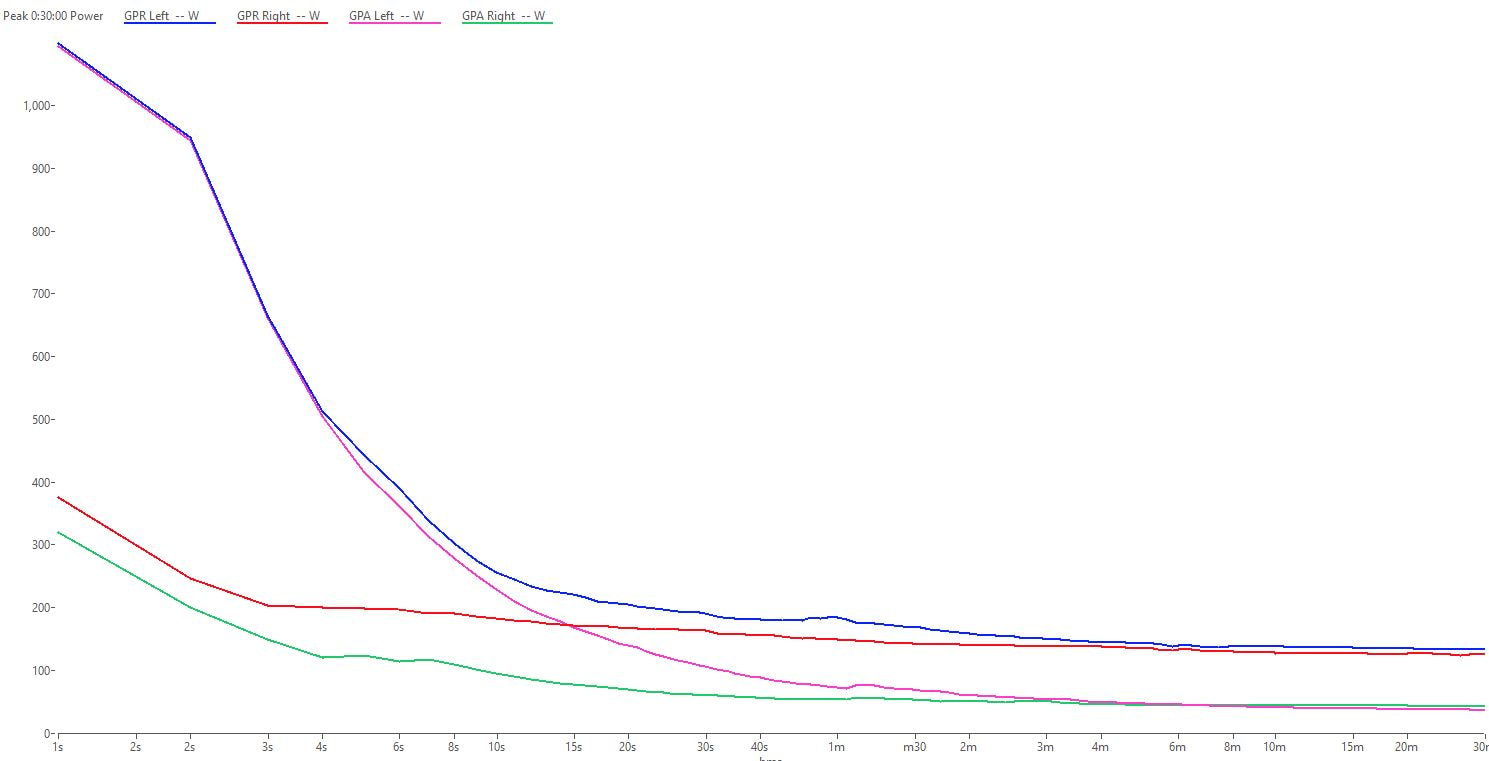
The chart below is from my ride this morning but now using my Stages Dual Sided PM and then viewing the data through WKO5. This gives a good graphical representation of what I'm talking about in the section above.

Here the terminology is a little different so see the explanation below:
GPA - Gross power absorbed 
GPR - Gross power received 
Essentially this chart displays your mean max gross power curve for each leg.
​
Got to love technology, no more labs... :-)
Picture
​Ok, I’m “sold”, now how do I improve my pedal efficiency? Simple… you have to groove your stroke and the easiest way to achieve this is through various drills.
Here are a few suggestions…

​Single-leg pedaling:
Do this on a stationary trainer. Unclip one leg and rest it on something and pedal with just the other leg. Keep the cadence, resistance and duration low until you develop your technique; start at 60 rpm. Alternate legs about every 30 seconds (or when you get fatigued) and gradually (over several weeks of practicing) increase the duration, cadence and then the resistance.
Pedaling with one leg will force you to move the pedal in full circles. You will notice right away how much work it is to pull through the bottom of the pedal stroke and lift the pedal back up and over the top. Try to eliminate the dead spots at the bottom and top of the pedaling circle, and keep the pedaling motion as even and smooth as possible. You should begin to see some improvement after a few weeks. Don't make the mistake of using momentum to "throw" the pedal up over the top. Move it purposefully.

Back and forth:
This drill emphasizes the application of pedaling force in the areas that are usually in the most need of improvement (the top and bottom of the pedaling circle). During this drill you'll be focusing on pushing the pedals over, or across, the top of the pedaling circle, and pulling them back through the bottom. Think about moving the pedals back and forth rather than up and down.
After a while you'll begin to develop a better overall pedaling force application by learning to apply force over the top and through the bottom of the stroke. As with the other drills, work on keeping the muscles relaxed.
This drill can be done on any ride at any time. Try and include it as often as possible.

Lifting your knee:
When climbing, focus on lifting your knees. This will un-weight the pedal and you'll notice less resistance; this is good. Think about bringing your knees straight up and pushing straight down over the top of your foot.
 
Focus on one portion of the pedal stroke at a time and you'll be able to improve it quicker. Then gradually piece them all together as one cohesive movement.
 
Until next time, stay warm...
0 Comments

A Bike Fitment Overview

5/6/2020

0 Comments

 
One of the most overlooked aspects of cycling and indeed multi-sport events is your setup on the bike. Unfortunately there IS an art to this and it is specific to your particular discipline. What I mean by this is your setup for triathlon will be very different from that of a mountain biker or road cyclist, and this can be broken down even further into a sprinter or climber. So make sure you speak to the correct people as this will make a huge difference to your comfort, performance and hopefully can help you remain injury free.

I’m going to assume that you have already purchased a bike to suite your needs, if not then a reputable bike shop will be able to guide you in making the correct purchase. As a crank is expensive, this is also an important consideration when purchasing your bike. The most common lengths available are 160, 165, 170, 172.5, 175 and 177.5mm. This has nothing to do with the gear ratio, but rather the actual length of the crank arms.
As a general rule of thumb you can use the following as a guide line:
 
Inseam to 78.74cm = 170mm cranks
Inseam 78.74 to 83.82cm = 172.5mm cranks
Inseam 83.82 and above = 175mm cranks​​
Picture
While I do advocate getting a professional setup sooner rather than later the following guide should help you with a “general setup” as there is a “fit window” for most riders. Before making any changes be warned though the longer you have been riding in a position, the longer it will take your body to adapt to the “new” and hopefully better position. It is recommended that you limit you changes in seat height to about 5mm every 300km. Alternatively find the “correct’ position, limit your training initially and gradually build up your training volume and intensity.
 
A good starting point in any bike setup is your cleat position, however, this is quite specialized and to obtain the correct cleat position ideally an “arch-o-meter” would be required. However as a rule of thumb, when clipped in, ensure that the axle of the pedal is directly under the ball of your foot and your feet are parallel to one another.
The next point of contact with the bike is your saddle. As there are literally thousands of variations on the market my advice here is find one that fits YOUR anatomy. Don’t go for what’s cool, or what’s light, go for what’s comfortable for you. Again you will need the help of a reputable bike shop that has “demo” saddles for you to try as they are costly. Usually a shorter wider saddle will be more suitable for a lady however there are many theories with regards to this.
Most riders find it best to have the saddle parallel to the ground, however some saddles have a high back so in these cases instead of putting the level straight across the entire length of the saddle, use only the sitting portion of the saddle.
Saddle height is probably the most important measurement when doing a bike setup but generally a knee bend of around 30 degrees should suffice. A saddle too low can be associated with pain in the front or sides of the knee while a saddle too high can be associated with pain in the back of the knee, hamstring or Achilles. Knee angles are measured when the leg is at the bottom of the pedal stroke and the foot is in its usual pedal position.
Once you are satisfied with your saddle height, you need to set your saddle fore-aft position. Sitting on your bike in a comfortable position rotate your right leg to a 3 o-clock position. Drop a plumb line from the bottom of your knee cap and it should pass through the center of the pedal axle. There can be quite a bit of variance here as climbers like to have the plumb line about 1 – 2cm behind the axle while sprinters, time trialists and triathletes sometimes come forward of the pedal axle. After you have adjusted your saddle fore-aft position recheck your saddle height as this may have changed with the fore-aft adjustment.
Right, feet done, bum done, next contact point will be your hands. Once again there are many configurations available, depending whether it’s a mountain bike, road bike or triathlon bike. For the purpose of this article I will stick to a simple road bike setup and here you need to ensure that your handle bar width is pretty much that of your shoulders from acromion to acromion.

Now check to see the shifter are level and the easiest way to do this is to place a straightedge under the drops then line the bottom of each shifter (brake lever) up with this. Check your handlebar angle by running an imaginary line from the ends of your handlebar drops parallel to the ground.
Picture
​Oh boy, here’s another tricky one… stem height!!! This has a lot to do with the riders flexibility a can be anywhere from zero to 10cm below the height of your saddle.
In general, the higher your stem, the more power you can produce, and the lower your stem the more aerodynamic you will be. Aerodynamics may more than compensate for your power loss but you will need to find a compromise between comfort, power and aerodynamics.
Stem length and height will combine to determine your torso angle which can vary from around 45 degrees (recreational) to around 10 degrees (time trialists).

Two traditional methods used to determine stem length require the rider so sit on the bike with hands in the drops and elbows bent comfortably as if riding. Without moving your head look at the front hub, it should be obscured by the top of the handlebar. There should also be around 1cm clearance between the elbow and the knee. Recreational riders would be more comfortable with a slightly shorter and higher stem.
 
This should give you a very general “fit window” from which you can progress as an athlete. However, I once again stress, the best advice I can give you is to get a professional BikeFit that will suite your needs.
 
Until next time, keep the rubber side down...
0 Comments

​How and why do we train through winter?

23/5/2020

0 Comments

 
Picture
Let’s face it, cycling is a great sport and pastime, especially when the sun is shining and the sky is blue, however getting out of bed when you know it’s below freeing outside can be a challenge.
 
So, why do we do it?
There are many reasons, but for some the biggest reason has to be the fear of loosing all their hard earned fitness because they know is gonna hurt like hell trying to get it back.. :-)

Another obvious reason would be the fact that with winter we all tend to eat a little more “comfort foods” than required and this tends to result in a few extra kilos that we as athletes can ill afford. Speaking of weight, there is no “magic formula” when it comes to weight loss. Its all about input – output!!!
Simply put, if you eat more calories than your body is utilizing, you will put on weight and visa versa. Obviously what you eat will have an impact on your ability to perform but that is beyond the scope of this article…
 
Now that we have an “idea” of why we train through winter, achieving this is often easier said than done.
At the start of winter so many riders have great plans of just what training they will be doing, how they are going to do it… bla, bla, bla… Once the first cold snap hits, they find an excuse why they should NOT train and the next thing they know… its spring, and all is lost… Sound familiar?
 
The best advice I can give is for you to set yourself some goals. These goals can be a mid-winter race or two but a more important race towards the end of winter or early spring is vital. The mid-winter races are there to help with the motivation and should be used more as a “hard training ride” than as a “win at all costs” race. Having an important race towards the end of winter will help give you a valid reason to train. So, when you are looking for a reason why you should NOT train, think of that important goal.

With the lack of light and freezing temperatures, winter also presents you with a perfect opportunity to get in some good cross-training. Along with the obvious cardiovascular benefits, cross-training helps maintain balance skills, muscle strength, hand-to-eye co-ordination and an improved range of motion.
If you have the facility, then a little gym work should be good for you. You don’t really want to add any weight or pack on bulk so keep the weights low and the reps high. Focus on your core and upper-body but don’t forget to stretch…  

Ply-metrics, Pilates and yoga along with your general circuit training should fit the bill. While cycling may not help you build your core, a good core will help improve your cycling as it aids your cycling technique and will help improve your power.

Running is also excellent as it will give you a tough cardio workout in a limited amount of time while also helping with your bone-density.

Swimming, hiking, skiing and ice-skating are other good examples of sports that will benefit your cycling come the summer months, don’t worry about a structured program, just have some fun and go for it!
 
Another “trick” I use with my athletes is to give them shorter more intense workouts during the week and then let them get in their longer slower rides over the weekend.
The fact that these week day rides are shorter makes it easier for them to be completed on an indoor-trainer. If the weather is “acceptable” however, make a commitment to a training partner and set a time and place to meet before hand. Why, well if you break your commitment you are not only letting yourself down, you are letting your training partner down, and THAT is not “cool”!!!

If you have problems with a runny nose in cold weather, here is a tip for you. Vasomotor rhinitis occurs when cold air makes your nose run, but nasal spray works well to help prevent this. Just make sure that what you are using is not on the banned list of substances :-)

On the weekend, you should have a little more time available so find a group that will enable you to get in some longer rides at a “controlled” pace and not at “race pace’… It’s ok to have a few “sprints” or surges here and there but you don’t want to be hammering it all day long. If you feel the pace is too high, sit in, get sucked along and enjoy the company that only a group ride can give. If you feel that the ride is too slow, then get on the front and do some work. Remember though that this is not a race, so ride within your training zones. Cycling is a sport that has a fair amount of etiquette so make sure the group you are riding in suites your needs. You don’t want to be the "that rider" messing it up for everyone else!
 
Those of you with a little extra time could look at a cycling training camp, preferably in a warmer climate. The objective behind these training camps should not be to simply “ride yourself into a coma” but rather to get in some steady miles over a rolling terrain. The change of scenery and added camaraderie will do wonders for your motivation and obviously aid your winter training.
 
On a final note, you don’t get bad weather you only get bad clothing… :-)

Ride safe, 
0 Comments

Coming out of Covid

12/5/2020

0 Comments

 
Never in my wildest dreams would I have imagined pretty much the entire world would be forced into lockdown. That sort of carry on only ever happens in Hollywood, right? … Wrong,  2020 took care of that!!!

For the majority of us, our training has been limited to indoors, for others limited outdoor training has been allowed provided we remained within our bubbles and geographical region.

At this point in time racing and events in general are pretty much on a wait and see basis. 
Not ideal for you as an athlete or for your coach as training with a plan is always the best way to achieve those results.

Now that I have gotten the doom and gloom out of the way, there does appear to be some light at the end of the tunnel. Restrictions in parts of the world are starting to lift and hopefully sooner rather than later the world will be returning to a new normal. 

With this in mind, as an athlete you need to start thinking about your training not only going forward but just as importantly what have you been able to achieve whilst still in lockdown? 

I was amazed at the incredible rides athletes were able to achieve indoors and while I can't really agree with the logic behind them I do tip my hat in admiration. I guess it's fair to say mental toughness has been taken to new heights. I was also taken back by the amount of intensity so many riders were training at day after day. All I can really say to this is as with most things in life, moderation is almost always the best approach.

​If you are lucky enough to have some indication when your racing is likely to resume I would highly recommend adjusting your training accordingly. Now is the perfect time to chat with your coach and get the remainder of the season dialed in.

If you have not yet made the commitment to getting a coach another option could be to purchase an online training plan. Again, think about what your training has been like over the past month or two, then decide on what you are expecting to achieve on the bike and choose a suitable plan that will help you achieve that.

As a small token of our appreciation to our athletes and friends we would like to offer a 15% discount on all our online training plans purchased from now until the end June 2020. Simply use the discount code Covid.
​
Stay safe and happy training. 
Training Plans
0 Comments

Importing custom workouts to your Garmin head unit

4/5/2020

0 Comments

 
As I've previously mentioned I'm not really a fan of riding indoors however, with the lockdown I did spend a fair amount of time training inside.
As a cycling coach and a rider who has pretty much always ridden to a structured workout having my PC screen "showing me" the watts I needed and my smart trainer trainer making all the resistance changes really did make the workouts "easy".
By this I mean I never had to think about my training, I just rode and my PC and trainer made sure I stuck to the plan.
With Level 3 came a little less restriction so I decided it was time to hit the road once again.... freedom never felt soooo good... :-) 
As good as it was, I suddenly realized that I was struggling to remember just what I had to do, in many ways I felt I was riding blind. In the old days, I would just write what I needed to do on a piece of tape and stick that on my stem and away I went. 
Well, this got me thinking, I have all the technology why not simply load it into my Garmin and take all the guess work out of it, hence this weeks blog as I'm sure I'm not the only one with a memory like a sieve... :-)

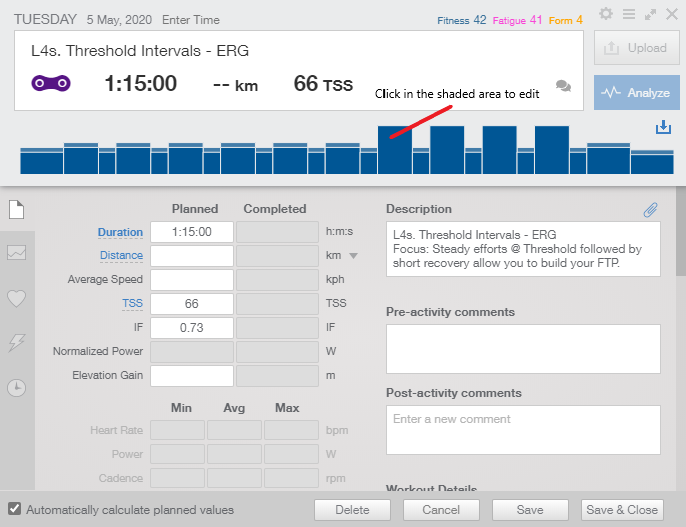
As I use TrainingPeaks and a Garmin Edge 520 when riding a quick Google search gave me the info I needed to get myself sorted. Obviously you would need to read up on the system you are using. 

Having used this on a few rides now, I can say with confidence that it does work way better than the old masking tape on the stem trick. It's simple enough to setup and really does help you hit your numbers.

A few pointers before heading out, for sure if its a basic ride, something like a recovery or aerobic workout where its pretty simple to remember your numbers I would not bother but add in some intervals and a bit of mental and physical fatigue and for sure you will start to struggle to recall everything that's required.

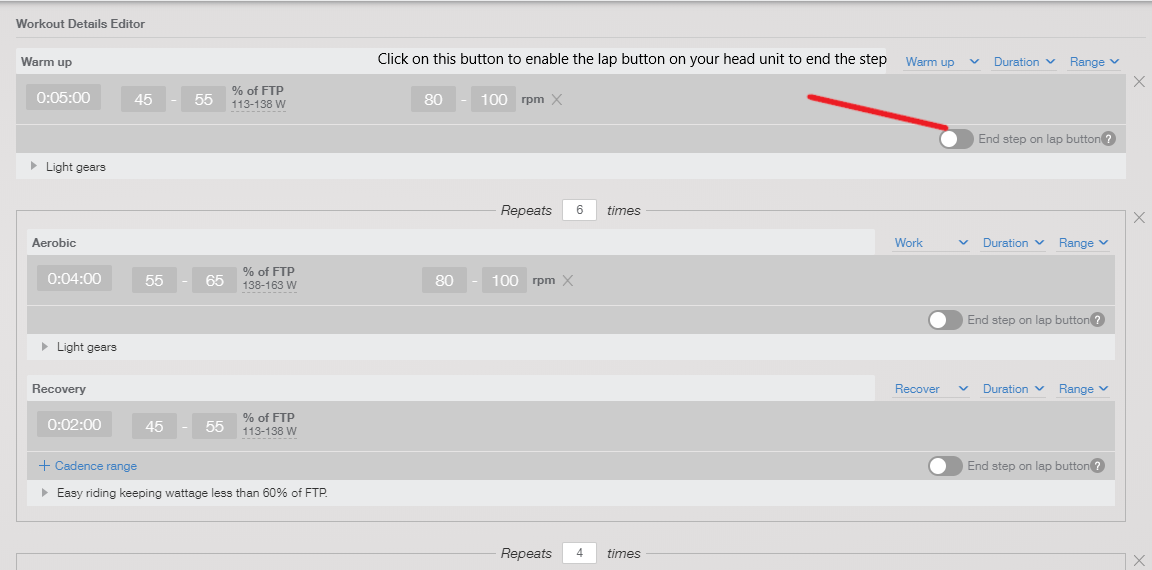
Another thing I would look at doing is opening up your workout in TrainingPeaks before you upload it to your Garmin and enable your "lap" button to determine just when you start the interval phase of your workout especially if you have some traffic to navigate or need to ride a few extra miles to find an appropriate section of road that's both safe and practical.
Once you are riding you can scroll through your Garmin pages as normal and at the start of each step you will be notified by a beep (actually 5) with the targets flashing up visually as well. 

It's also important to note that you can set this up for power, heart rate or perceived exertion. 

The link below is the YouTube clip that I used to navigate my way through the setup.
https://youtu.be/_j2LkXqNArw

I hope you find this to be useful, now all you have to do is get out there and ride... :-)

Ride safe & enjoy
​
0 Comments

So what can YOU do with your road bike?

10/10/2012

0 Comments

 
Absolutely amazing what some guys can do on a bike, let alone a ROAD
bike...

Not only is this a testiment to the
riders ability but also to the manufaturer of the bike and the components
used...

Hmm, I wonder if we should show this
video clip to ex-SA road champion Christoff van Heerden... :-) 
#respect
0 Comments

Amstrong choose not to fight USADA charges - full statement

24/8/2012

0 Comments

 
Picture
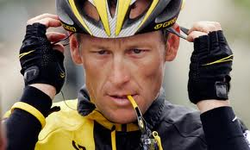
AUSTIN, Texas - August 23rd, 2012 - There comes a point in every man's life when he has to say, "Enough is enough." For me, that time is now. I have been dealing with claims that I cheated and had an unfair advantage in winning my seven Tours since 1999. Over the past three years, I have been subjected to a  two-year federal criminal investigation followed by Travis Tygart's unconstitutional witch hunt. The toll this has taken on my family, and my work for our foundation and on me leads me to where I am today – finished with this nonsense. 

I had hoped that a federal court would stop USADA’s charade. Although the court was sympathetic to my concerns and recognized the many improprieties and deficiencies in USADA’s motives, its conduct, and its process, the court
ultimately decided that it could not intervene. 

If I thought for one moment that by participating in USADA’s process, I could confront these allegations in a fair setting and – once and for all – put these charges to rest, I would jump at the chance. But I refuse to participate in a process that is so one-sided and unfair. Regardless of what Travis Tygart says, there is zero physical evidence to support his outlandish and heinous claims. The only physical evidence here is the hundreds of controls I have passed with flying colors. I made myself available around the clock and around the world. In-competition. Out of competition. Blood. Urine. Whatever they asked for I
provided. What is the point of all this testing if, in the end, USADA will not stand by it?

From the beginning, however, this investigation has not been about learning the truth or cleaning up cycling, but about punishing me at all costs. I am a retired cyclist, yet USADA has lodged charges over 17 years old despite its own 8-year limitation. As respected organizations such as UCI and USA Cycling have made clear, USADA lacks jurisdiction even to bring these charges. The international bodies governing cycling have ordered USADA to stop, have given notice that no one should participate in USADA’s improper proceedings, and have made it clear the pronouncements by USADA that it has banned people for life or stripped them of their accomplishments are made without authority. And as many others, including USADA’s own arbitrators, have found, there is nothing even remotely fair about its process. USADA has broken the law, turned its back on its own rules, and stiff-armed those who have tried to persuade USADA to honor its obligations. At every turn, USADA has played the role of a bully, threatening everyone in its way and challenging the good faith of anyone who
questions its motives or its methods, all at U.S. taxpayers’ expense. For the last two months, USADA has endlessly repeated the mantra that there should be a single set of rules, applicable to all, but they have arrogantly refused to
practice what they preach. On top of all that, USADA has allegedly made deals with other riders that circumvent their own rules as long as they said I cheated. Many of those riders continue to race today.

 The bottom line is I played by the rules that were put in place by the UCI, WADA and USADA when I raced. The idea that athletes can be convicted today without positive A and B samples, under the same rules and procedures that apply
to athletes with positive tests, perverts the system and creates a process where any begrudged ex-teammate can open a USADA case out of spite or for personal gain or a cheating cyclist can cut a sweetheart deal for themselves. It’s an
unfair approach, applied selectively, in opposition to all the rules. It’s just not right. 

USADA cannot assert control of a professional international sport and attempt  to strip my seven Tour de France titles. I know who won those seven Tours, my teammates know who won those seven Tours, and everyone I competed against knows who won those seven Tours. We all raced together. For three weeks over the same roads, the same mountains, and against all the weather and elements that we had to confront. There were no shortcuts, there was no special treatment. The same courses, the same rules. The toughest event in the world where the strongest man wins. Nobody can ever change that. Especially not Travis Tygart. 

Today I turn the page. I will no longer address this issue, regardless of the circumstances. I will commit myself to the work I began before ever winning a single Tour de France title: serving people and families affected by cancer, especially those in underserved communities. This October, my Foundation will celebrate 15 years of service to cancer survivors and the milestone of raising nearly $500 million. We have a lot of work to do and I'm looking forward to an end to this pointless distraction. I have a responsibility to all those who have stepped forward to devote their time and energy to the cancer cause. I will not stop fighting for that mission. Going forward, I am going to devote myself to raising my five beautiful (and energetic) kids, fighting cancer, and attempting to be the fittest 40-year old on the planet.

Original statement here


0 Comments

FTP time...

1/8/2012

1 Comment

 
Picture
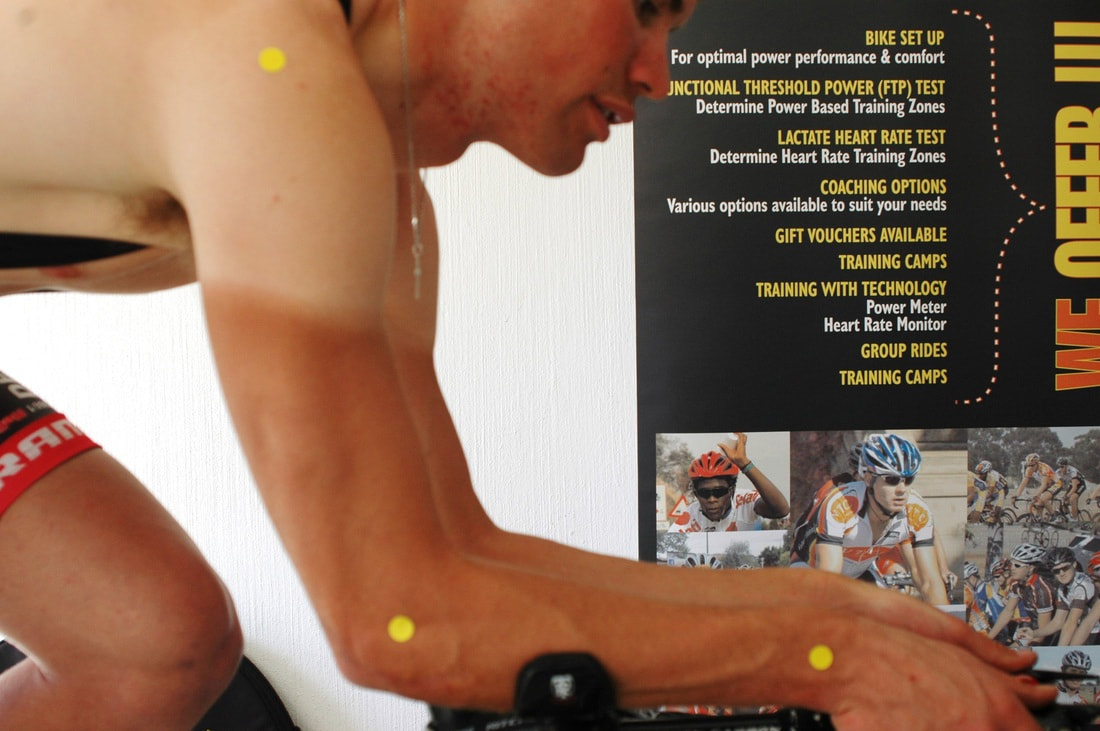
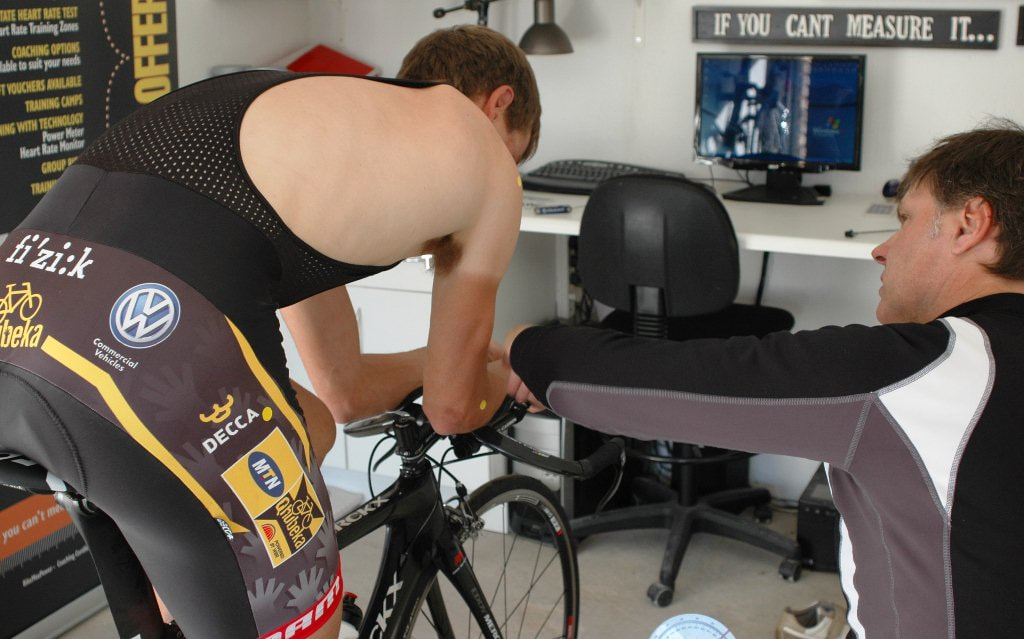
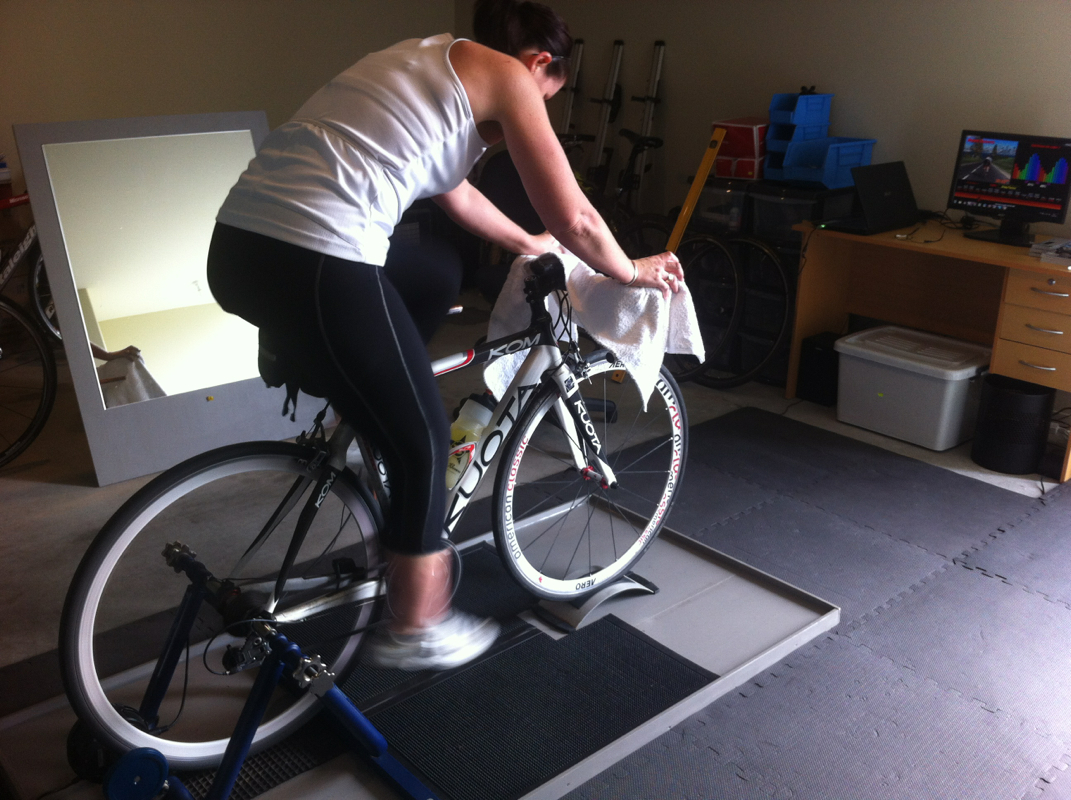
One of our athletes Maree giving it her all during her FTP test earlier today... If you can't measure it, you can't manage it!
1 Comment

    Archives

    June 2020
    May 2020
    April 2020
    August 2013
    July 2013
    June 2013
    May 2013
    November 2012
    October 2012
    September 2012
    August 2012

    Categories

    All
    General
    Racing
    Technology
    Training

    RSS Feed

© 2004-2020 Virtual Training Centre